Hands-on dashboard tutorial · ATRIUM · About 20 minutes
School buildings change throughout the day. Classrooms fill and empty, gyms host activities outside normal teaching hours, and a single floor may contain spaces with very different loads. ATRIUM brings building context and equipment information into one interface. This tutorial teaches a repeatable way to check classroom-area conditions without confusing a floor summary with an individual room measurement.
Your outcome: a correctly scoped review of one school floor, with supporting air-handling-unit observations and a specific next check. The exercise is observational; no schedule, alarm acknowledgement, or control change is needed.
Before you begin
Open the ATRIUM browser demo. It uses simulated values for Lincoln High School, so your readings may differ from the examples. An installed dashboard depends on the project's equipment relationships, point bindings, histories, and permissions. Use this walkthrough to learn the navigation and reasoning, then verify the corresponding configuration on your site.
Write down the question you are investigating. For example: “Are the second-floor classroom areas showing a broader comfort pattern, or do we need to investigate a particular room?” Record the reported location, time, occupancy, and duration. This keeps the investigation anchored to a specific event.
1. Start with the dashboard summary
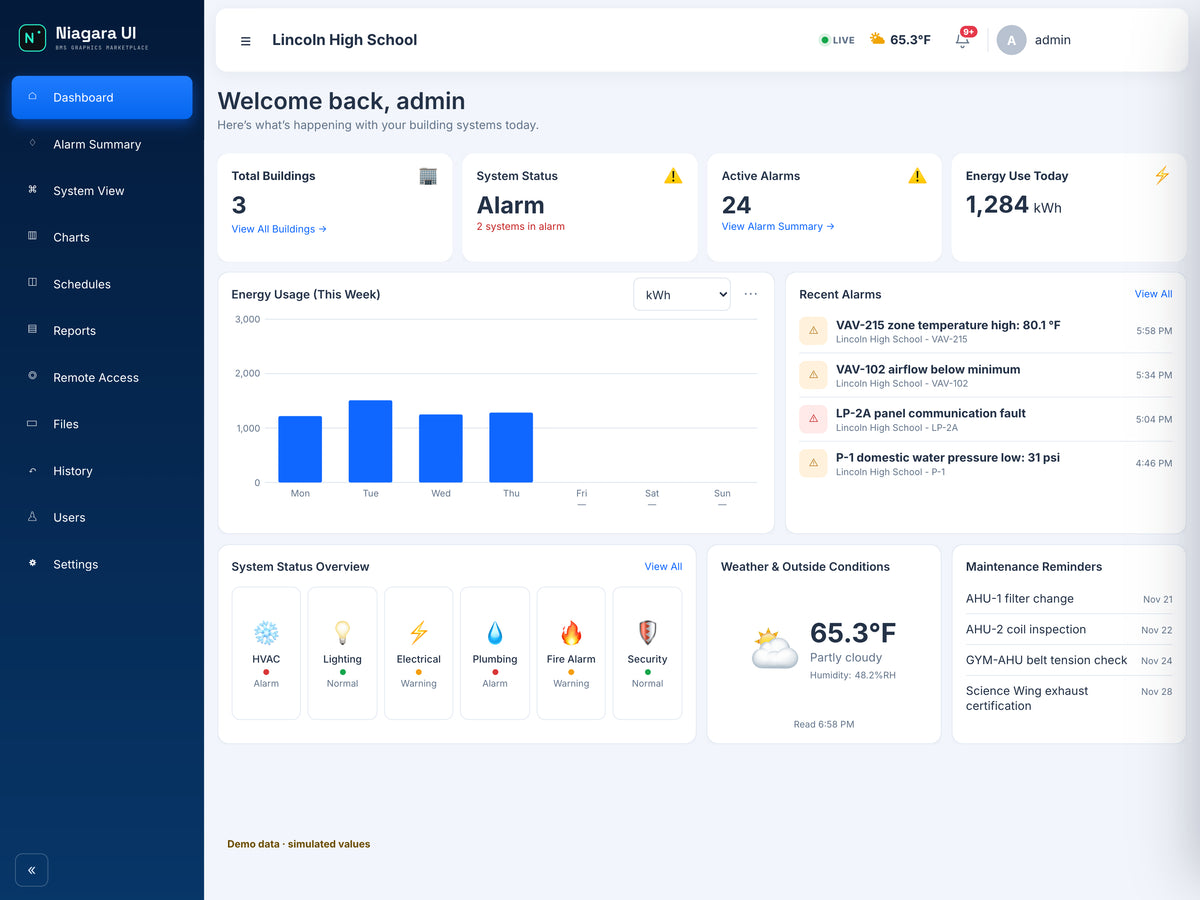
Read this screen
- Building scopeConfirm the building and the complaint location before interpreting the school-wide status.
- Source coverageRead freshness and coverage messages with the alarm and energy summaries.
- Open Dashboard in the left navigation.
- Review the System Status and Active Alarms cards.
- Read Recent Alarms for equipment names and event times. The demo includes examples such as VAV-215 High Temp and AHU-3 Supply Fan Failure.
- Check the outside conditions and the relevant system summary before moving into the building.
These cards provide context, not a diagnosis. An overall “Normal” system indicator does not cancel a listed local alarm. Likewise, an older alarm entry may not describe the current state of the room in question. Keep the location, time, and status together when making notes, and use your site's alarm procedure for actual response priorities.
2. Set the scope in System View
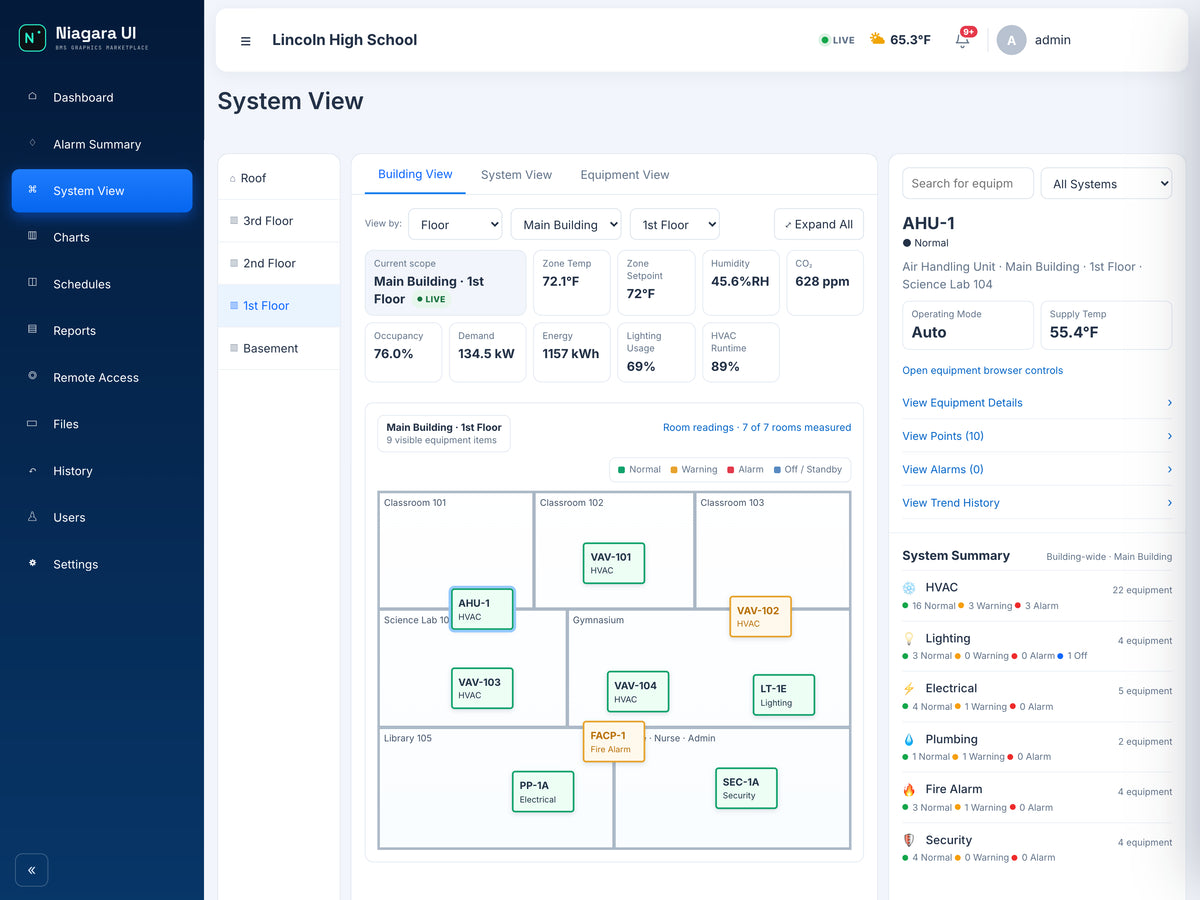
Read this screen
- Building and floorSelect the correct building and floor in System View before using plan markers.
- Room and equipmentFollow the affected room or equipment relationship, then verify the associated source and history.
- Open System View from the left navigation.
- Set View by to Floor.
- Choose Main Building in the building selector.
- Choose 2nd Floor with the Floor selector or the floor navigation buttons.
- Confirm that Current Scope reads Main Building · 2nd Floor.
This confirmation is essential. A correct-looking temperature is not useful if it belongs to the wrong floor. The demo floor layout includes Classroom 201, Classroom 202, Classroom 203, Science 204, Art Room 205, and West Corridor, alongside equipment markers. Use the layout to orient yourself, but verify the actual equipment-to-room relationships in your project documentation before assigning a fault to a specific classroom.
3. Read the floor conditions as a group
The Current Scope strip brings together Zone Temp, Humidity, CO₂, Occupancy, and Demand / Alarms. Record all five rather than selecting only the most striking number. In one example snapshot, the second-floor strip showed approximately 72.8°F, 47% RH, 678 ppm CO₂, 82% occupancy, and one alarm. These are example demo readings, not recommended setpoints or acceptance limits.
Each quantity answers a different question. Temperature describes a thermal condition; relative humidity adds moisture context; CO₂ can help investigate ventilation in relation to occupancy; occupancy describes use; electrical demand describes instantaneous power. None of these values alone proves that every classroom is comfortable or adequately ventilated.
Important distinction: the selected-floor strip is scoped summary information. Do not label its CO₂ or temperature value as “Classroom 203” unless the installed point mapping explicitly supports that interpretation. If a complaint concerns one classroom, the next step is to locate its own sensor or serving terminal-unit points.
4. Inspect the displayed AHU information
With Main Building · 2nd Floor selected, the demo displays the AHU-2 detail panel. Confirm the equipment name and location before reading Supply Temp, Return Temp, Status, Supply Fan, Return Fan, and Economizer. Then review the Live Points table, including Operating Mode, Command, Runtime Today, and Updated.
Worked example: a supply-air reading of 60.1°F and return-air reading of 72.3°F give a return-to-supply difference of 12.2°F. That difference describes two air-temperature points at that moment. It is not chilled-water ΔT, and it is not sufficient to calculate delivered cooling capacity without the appropriate airflow and other required conditions.
Read commands and status as different kinds of evidence. A command expresses intended operation; a status indicates a reported condition. On a real project, establish whether “On” is actual feedback or simply a commanded state. A normal-looking display cannot substitute for checking point quality and the commissioned sequence of operation.
5. Compare floors without losing the original question
Switch to 1st Floor, confirm the Current Scope change, and record the same set of summary values. Then return to 2nd Floor. This gives you a structured comparison: same building, same categories, nearly the same observation time.
A difference between floors is a lead to investigate, not automatic evidence of a fault. The first floor may have different occupancy, room uses, exposure, or equipment. If the second floor has a higher CO₂ reading while also showing higher occupancy, note both. Check the approved ventilation design and actual room-level data before concluding that outside-air delivery is inadequate.
6. Turn observations into the next verification
For an individual classroom concern, ask for the room temperature, applicable setpoint, occupancy schedule, serving equipment, and history covering the reported period. For a broad floor pattern, review common upstream equipment and operating schedules. If readings appear frozen, verify the update timestamp, communication status, and point binding before treating them as current measurements.
A useful note reads: “Main Building · 2nd Floor, [time]. Scoped temperature [value], CO₂ [value], occupancy [value], alarms [count]. AHU-2 supply/return temperatures [values], reported fan status [value], update [time]. Classroom-level point and complaint-period history still needed.” This explicitly separates what you observed from what remains unverified.
Completion checklist
- Building and floor confirmed in Current Scope.
- Summary values recorded with units and observation time.
- Floor-level data distinguished from classroom-level measurements.
- Equipment identity and point update information reviewed.
- Comparison floor checked without assuming equal loads.
- Next investigation step tied to a specific room, point, or schedule.
Explore the ATRIUM dashboard package or visit Support to request help or a demonstration. Packages are available through Software Downloads; a license is required to run them on your host.